Cross-Browser Selenium testing with Robot Framework and Sauce Labs
How do you keep your Selenium tests up-to-date with your ever-changing user interface? Do you try to fix your existing tests, or do you just re-record them over and over again?
In the Plone Community, we have chosen the former approach (Plone is a popular open source CMS written in Python). We use a tool called Robot Framework to write our Selenium acceptance tests as maintainable BDD-style stories. Robot Framework’s extensible test language allows us to describe Plone’s features in a natural language sentences, which can then be expanded into either our domain specific or Selenium WebDriver API based testing language.
As an example, have a look at the following real-life acceptance test case on the next generation multilingual support in Plone:
*** Test Cases ***

Scenario: As an editor I can add new translation
    Given a site owner
      and a document in English
      and a document in Catalan
     When I view the Catalan document
      and I add the document in English as a translation
      and I switch to English
     Then I can view the document in English

*** Keywords ***

a site owner
    Enable autologin as  Manager

a document in English
    Create content  type=Document
    ...  container=/${PLONE_SITE_ID}/en/
    ...  id=an-english-document
    ...  title=An English Document

a document in Catalan
    Create content  type=Document
    ...  container=/${PLONE_SITE_ID}/ca/
    ...  id=a-catalan-document
    ...  title=A Catalan Document

I view the Catalan document
    Go to  ${PLONE_URL}/ca/a-catalan-document
    Wait until page contains  A Catalan Document

I add the document in English as a translation
    Click Element  css=#plone-contentmenu-multilingual .actionMenuHeader a
    Wait until element is visible  css=#_add_translations

    Click Element  css=#_add_translations
    Wait until page contains element
    ...  css=#formfield-form-widgets-content-widgets-query .searchButton

    Click Element  css=#formfield-form-widgets-content-widgets-query .searchButton
    Wait until element is visible  css=#form-widgets-content-contenttree a[href$='/plone/en']

    Click Element  css=#form-widgets-content-contenttree a[href$='/plone/en']
    Wait until page contains  An English Document

    Click link  xpath=//*[contains(text(), 'An English Document')]/parent::a
    Click Element  css=.contentTreeAdd

    Select From List  name=form.widgets.language:list  en
    Click Element  css=#form-buttons-add_translations
    Click Element  css=#contentview-view a
    Wait until page contains  A Catalan Document

I switch to English
    Click Link  English
    Wait until page contains  An English Document

I can view the document in English
    Page Should Contain Element
    ...  xpath=//*[contains(@class, 'documentFirstHeading')][./text()='An English Document']
    Page Should Contain Element
    ...  xpath=//ul[@id='portal-languageselector']/li[contains(@class, 'currentLanguage')]/a[@title='English']
About Robot Framework
Robot Framework is a generic keyword-driven test automation framework for acceptance testing and acceptance test-driven development. It’s a neat tool by itself, yet its testing capabilities can be extended implementing custom test libraries either with Python or Java — without any other limits.
The super powers of Robot Framework come from its user keyword feature: in addition to the keywords provided by the extension libraries, users can create new higher-level keywords from the existing ones using the same syntax that is used for creating test cases. And, of course, everything can be parametrized with variables.
How could you cross-browser test your web applications with Robot Framework and its popular Selenium WebDriver keyword library?
Installing Robot Framework
To get started, we need Firefox,
Python 2.7 (or
Python 2.6) with
pip package manager and
virtualenv isolation packages
installed. For Linux-distributions, all of these should be available
directly from the system repositories (e.g. using
apt-get install python-virtualenv in Ubuntu), but on OS X and Windows,
some extra steps would be needed.
Once all these prerequisites all available, you can install Robot Framework and all the requirements for Selenium-testing with:
$ virtualenv robot --no-site-packages
$ robot/bin/pip install robotframework-selenium2library
The installation process should look something like:
$ virtualenv robot --no-site-packages
New python executable in robot/bin/python
Installing Setuptools...done.
Installing Pip...done.

$ robot/bin/pip install robotframework-selenium2library
Downloading/unpacking robotframework-selenium2library
  Downloading robotframework-selenium2library-1.5.0.tar.gz (216kB): 216kB downloaded
  Running setup.py egg_info for package robotframework-selenium2library
  ...
Downloading/unpacking decorator>=3.3.2 (from robotframework-selenium2library)
  Downloading decorator-3.4.0.tar.gz
  Running setup.py egg_info for package decorator
  ...
Downloading/unpacking selenium>=2.32.0 (from robotframework-selenium2library)
  Downloading selenium-2.40.0.tar.gz (2.5MB): 2.5MB downloaded
  Running setup.py egg_info for package selenium
  ...
Downloading/unpacking robotframework>=2.6.0 (from robotframework-selenium2library)
  Downloading robotframework-2.8.4.tar.gz (579kB): 579kB downloaded
  Running setup.py egg_info for package robotframework
  ...
Downloading/unpacking docutils>=0.8.1 (from robotframework-selenium2library)
  Downloading docutils-0.11.tar.gz (1.6MB): 1.6MB downloaded
  Running setup.py egg_info for package docutils
  ...
Installing collected packages: robotframework-selenium2library, decorator, selenium, robotframework, docutils
  Running setup.py install for robotframework-selenium2library
  ...
  Running setup.py install for decorator
  ...
  Running setup.py install for selenium
  ...
  Running setup.py install for robotframework
  ...
  Running setup.py install for docutils
  ...
 Successfully installed robotframework-selenium2library decorator selenium robotframework
 docutils
 Cleaning up...
And we should end up having the Robot Framework executable installed at:
$ robot/bin/pybotWriting a Selenium test suite in robot
In the following examples, we use Robot Framework’s space separated
plain text test
format.
In this format a simple test suite can be written in a single plain text
file named with a .robot suffix. To maximize readability, only two or
more spaces are required to separate the different test syntax parts in
the same line.
In the first example, we:
- import Selenium2Library to enable Selenium keywords (because only the built-in keywords are available by default)
- define simple test setup and teardown keywords
- implement a simple test case using the imported Selenium keywords
- use a tag to categorize the test case
- abstract the test with a variable to make it easier to update the test later.
Now, write the following complete Selenium test suite into a file named
test_saucelabs_login.robot:
*** Settings ***
Selenium2Library
Open test browser
Close test browser
*** Variables ***
${LOGIN_FAIL_MSG} Incorrect username or password.
*** Test Cases ***
Incorrect username or password
Login
Go to https://saucelabs.com/login
Page should contain element id=username
Page should contain element id=password
Input text id=username anonymous
Input text id=password secret
Click button id=submit
Page should contain ${LOGIN_FAIL_MSG}
*** Keywords ***
Open test browser
Open browser about:
Close test browser
Close all browsersA standalone test suite may contain one to four sections from
*** Settings ***, *** Variables ***, *** Test Cases *** and
*** Keywords ***, but always the *** Test Cases *** section. To
summarize the sections:
Settings
: Imports all the used keyword libraries and user keyword resource files. Contains all test suite level configuration such as suite/test setup and teardown instructions.
Variables
: Defines all suite level variables with their default values.
Test Cases
: Contains all the test cases for the test suite.
Keywords
: Contains all the suite level user keyword implementations.
For the complete list of all available features for each of these sections, you can refer to Robot Framework User Guide.
Running a robot test suite
The default Robot Framework test runner is called pybot. Next, we can
execute our test suite and create a test report from the execution by
typing:
$ robot/bin/pybot test_saucelabs_login.robotBesides opening a web browser, our example test suite run should look like:
$ robot/bin/pybot test_saucelabs_login.robot
==============================================================================
Test Saucelabs Login
==============================================================================
Incorrect username or password                                        | PASS |
------------------------------------------------------------------------------
Test Saucelabs Login                                                  | PASS |
1 critical test, 1 passed, 0 failed
1 test total, 1 passed, 0 failed
==============================================================================
Output:  /.../output.xml
Log:     /.../log.html
Report:  /.../report.html
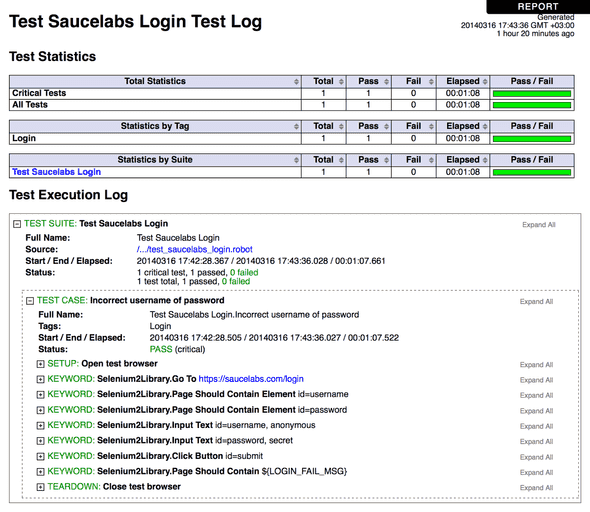
And the test run should result a HTML test report file named
report.html and a complete step by step test log file named
log.html. The latter should look like:
To see all the available options for the test runner, just type:
$ robot/bin/pybot --helpWriting a Sauce-Labs Selenium test suite in robot
Now that we have a working Robot Framework installation and a functional test suite, we can continue to refactor the test suite to support cross-browser testing with Sauce Labs.
Let’s update our test_saucelabs_login.robot to look like:
*** Settings ***
Selenium2Library
SauceLabs
Open test browser
Close test browser
*** Variables ***
${BROWSER} firefox
${REMOTE_URL}
${DESIRED_CAPABILITIES}
${LOGIN_FAIL_MSG} Incorrect username or password.
*** Test Cases ***
Incorrect username or password
Login
Go to https://saucelabs.com/login
Page should contain element id=username
Page should contain element id=password
Input text id=username anonymous
Input text id=password secret
Click button id=submit
Page should contain ${LOGIN_FAIL_MSG}
*** Keywords ***
Open test browser
Open browser about: ${BROWSER}
... remote_url=${REMOTE_URL}
... desired_capabilities=${DESIRED_CAPABILITIES}
Close test browser
Run keyword if '${REMOTE_URL}' != ''
... Report Sauce status
... ${SUITE_NAME} | ${TEST_NAME}
... ${TEST_STATUS} ${TEST_TAGS} ${REMOTE_URL}
Close all browsersAll the things we changed:
- a new keyword library called
SauceLabsis imported - keyword
Open test browseris abstracted to be configurable with variables to support running the tests at Sauce Labs - keyword
Close test browseris enhanced to send test details and test result to Sauce Labs by calling the newReport Sauce statuskeyword.
Next, we must implement our custom Sauce Labs keyword library with
Python by creating the following SauceLabs.py file to provide the new
Report Sauce status keyword:
import re
import requests
import simplejson as json

from robot.api import logger
from robot.libraries.BuiltIn import BuiltIn

USERNAME_ACCESS_KEY = re.compile('^(http|https):\/\/([^:]+):([^@]+)@')


def report_sauce_status(name, status, tags=[], remote_url=''):
    # Parse username and access_key from the remote_url
    assert USERNAME_ACCESS_KEY.match(remote_url), 'Incomplete remote_url.'
    username, access_key = USERNAME_ACCESS_KEY.findall(remote_url)[0][1:]

    # Get selenium session id from the keyword library
    selenium = BuiltIn().get_library_instance('Selenium2Library')
    job_id = selenium._current_browser().session_id

    # Prepare payload and headers
    token = (':'.join([username, access_key])).encode('base64').strip()
    payload = {'name': name,
               'passed': status == 'PASS',
               'tags': tags}
    headers = {'Authorization': 'Basic {0}'.format(token)}

    # Put test status to Sauce Labs
    url = 'https://saucelabs.com/rest/v1/{0}/jobs/{1}'.format(username, job_id)
    response = requests.put(url, data=json.dumps(payload), headers=headers)
    assert response.status_code == 200, response.text

    # Log video url from the response
    video_url = json.loads(response.text).get('video_url')
    if video_url:
        logger.info('<a href="{0}">video.flv</a>'.format(video_url), html=True)
Finally, we must install a couple of required Python libraries into our Python virtual environment with:
$ robot/bin/pip install simplejson requestsWe are almost there!
Running a robot test suite with Sauce Labs
Once we have abstracted our test suite to support Sauce Labs with configurable suite variables, we can run the tests either locally, or using Sauce Labs, or using different browsers at Sauce Labs, just by executing the Robot Framework test runner with different arguments.
-
To run the test suite locally, we simply type:
$ robot/bin/pybot test_saucelabs_login.robot -
To run the test at Sauce Labs, we pass the Sauce Labs OnDemand address as
${REMOTE_URL}variable by using-vargument supported by the test runner:$ robot/bin/pybot -v REMOTE_URL:http://USERNAME:ACCESS_KEY@ondemand.saucelabs.com:80/wd/hub test_saucelabs_login.robotMake sure to replace USERNAME and ACCESS_KEY with your Sauce Labs account username and its current access key!
-
To change the Sauce Labs test browser or platform, we just need to add an another variable with
-vto define the required browser in${DESIRED_CAPABILITIES}variable passed to Selenium.The only trick is to know the format used by the Selenium keyword library: a comma separated string with KEY:VALUE-pairs of the desired WebDriver capabilities.
The full command to run the test suite with iPhone 7 browser at Sauce Labs would look like:
$ robot/bin/pybot -v DESIRED_CAPABILITIES:"platform:OS X 10.9,browserName:iphone,version:7" -v REMOTE_URL:http://USERNAME:ACCESS_KEY@ondemand.saucelabs.com:80/wd/hub test_saucelabs_login.robot -
And to top the cake, we can also include our CI build number, just by adding the parameter into our desired capabilities string:
$ robot/bin/pybot -v DESIRED_CAPABILITIES:"build:demo,platform:OS X 10.9,browserName:iphone,version:7" -v REMOTE_URL:http://USERNAME:ACCESS_KEY@ondemand.saucelabs.com:80/wd/hub test_saucelabs_login.robot
This is how our final tests would look in the Sauce Labs test table, with test names, tags, build numbers, results and all the stuff!
Quite nice, isn’t it.
P.S. The final example can be downloaded as a gist at: https://gist.github.com/datakurre/9589707
Written by Asko Soukka — an occasional Plone core contributor and a full time web developer at University of Jyväskylä, Finland.


