Generate annotated screenshots with plone.app.robotframework
Greetings from Sorrento, from Plone Open Garden 2013. The symposium/sprint was amazing, with the greatest possible venue, the nicest community out there and my most productive sprint days so far. Thanks a lot to Maurizio Delmonte and Abstract IT folks for organizing the event. Also, thanks to my employer, University of Jyväskylä for allowing and sponsoring me to participate the sprint. I believe, it was worth it…
plone.app.robotframework
During the sprint I released a package called plone.app.robotframework to ease writing of Robot Framework tests for Plone and add-ons. plone.act is dead, long live plone.app.robotframework. It contains everything in plone.act (the same code from the same authors), but also much much more:
- Common variables and keywords to open Selenium test browsers so that the same tests can be run locally, on CI, with Selenium grid and even with Sauce Labs (with or without Travis-CI) without modifying the tests themselves.
- Sauce Labs -integration keywords, which allow not only run tests on locally or at Travis-CI with Sauce Labs’ browsers, but also send build-numbers, test names, test tags to Sauce Labs.
- Helper library for logging users automatically into Plone so that we can skip login forms and save a lot of time in tests.
- Helper library base for implementing database dependent test setup keywords in Python to save even more time in tests.
- Keywords for annotating open pages and cropping captured images so that Robot Framework test can be used to both make screencasts and illustrate Sphinx documentation (and keep both of them up to date with the current code.
Read the new tutorial about writing Robot Framework tests with plone.app.robotframework at Plone Developer Documentation.
But there’s one specific new feature, I’d like to rise above others:
Generating screenshots
We know that this would be possible, but we thought that it would be much harder. Read from Guido’s PloneSocial PLOG2013 Sprint Report, how we implemented the base for functional testing with Robot Framework, Selenium, Travis-CI and Sauce Labs for PloneSocial-suite, and wondered about the possibility of creating screencasts with Robot Framework.
One thing led to another, and just a day later I had the initial implementations of screen annotation keywords and screenshot cropping keywords ready.
You can see everything in action with this minimal example:
bootstrap.py
$ curl -O http://downloads.buildout.org/2/bootstrap.pybuildout.cfg
[buildout]
extends = http://dist.plone.org/release/4.3-latest/versions.cfg
parts = pybot

[pybot]
recipe = zc.recipe.egg
eggs =
    Pillow
    plone.app.robotframework
scripts = pybot
docs.robot
*** Settings ***
plone/app/robotframework/server.robot
plone/app/robotframework/annotate.robot
Setup
Teardown
*** Keywords ***
Setup
Setup Plone site plone.app.robotframework.testing.AUTOLOGIN_ROBOT_TESTING
Import library Remote ${PLONE_URL}/RobotRemote
Teardown
Teardown Plone Site
*** Test Cases ***
Portal factory add menu
Enable autologin as Contributor
Set autologin username John Doe
Go to ${PLONE_URL}
Click link css=#plone-contentmenu-factories dt a
Element should be visible
... css=#plone-contentmenu-factories dd.actionMenuContent
${dot1} = Add dot
... css=#plone-contentmenu-factories dt a 1
${note1} = Add note
... css=#plone-contentmenu-factories
... At first, click Add new… to open the menu
... width=180 position=left
${dot2} = Add dot
... css=#plone-contentmenu-factories dd.actionMenuContent 2
${note2} = Add note
... css=#plone-contentmenu-factories dd.actionMenuContent
... Then click any option to add new content
... width=180 position=left
Align elements horizontally ${dot2} ${dot1}
Align elements horizontally ${note2} ${note1}
Capture and crop page screenshot add-new-menu.png
... contentActionMenus
... css=#plone-contentmenu-factories dd.actionMenuContent
... ${dot1} ${note1} ${dot2} ${note2}
Remove elements ${dot1} ${note1} ${dot2} ${note2}Running
$ python bootstrap.py
$ bin/buildout
$ mkdir -p docs/source/images
$ bin/pybot -d docs/source/images -r NONE -l NONE -o NONE docs.robot
Results
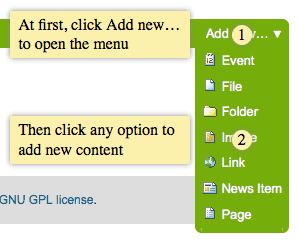
This all should result the next nicely annotated and cropped screenshot
as docs/source/images/add-new-menu.png:
Just think about having that bin/pybot-line in the next
Sphinx-makefile…
… and, of course, those annotation keywords will work for creating screencasts too. Actually, those keywords are not even Plone specific, but they do rely on jQuery being found on the captured page.
PS. You may wonder, how pybot can start Plone for capturing screenshots. For that, I have to thank Godefroid Chapell for writing the original robot keywords in plone.app.robotframework for setting up and tearing down test layers without zope.testrunner (see the keywords Setup Plone site and Teardown Plone site).

